Running scalable httpd service on AWS
Let’s learn on how to use Amazon EFS, with your ASG + ALB + EC2 Architecture to build a scalable HTTPD Service.
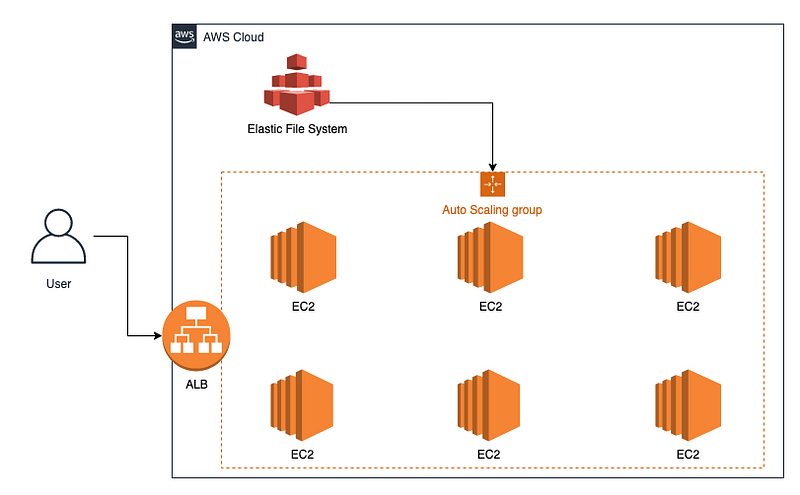
Running scalable httpd service on AWS with ASG + ALB + EFS
—
Prerequisites
—
- An AWS Account
- Basic knowledge regarding EFS, ASG, LaunchConfig, ALB, and EC2.
- We’ll be using
t2.microinstance type as it is under AWS Free Tier, but I will still use Spot Instance :D. - We’ll be deploying our instances in
Public Subnet, using the default VPC inside of AWS that was created for you by default. - Basic VPC Knowledge; CIDR, Subnet, Route Tables, etc
—
#1: Creating your custom EC2 Security Group
—
SG #1
Name: efs-sg-default
Description: Allows EFS Access
VPC: AWS Default VPC
Inbound rules
1. NFS -> 0.0.0.0/0
Tags
Name -> Allow EFS
Others
Set it as default
— — — —
SG #2
Name: alb-sg
Description: Allows HTTP Access via ALB (Port 80)
VPC: AWS Default VPC
Inbound rules:
1. HTTP -> 0.0.0.0/0
Tags:
Name -> Allow HTTP for ALB
Others
Set it as default
— — — —
SG #3
Name: ec2-sg
Description: SG for EC2
VPC: AWS Default VPC
Inbound rules
1. HTTP -> alb-sg (Select SG)
2. SSH -> 0.0.0.0/0
Tags
Name -> SG for EC2
Others
Set it as default
—
#2: Creating your EFS (Elastic File System)
—
Configurations:
Name: Website Data
Availability and durability: One Zone
AZ: ap-southeast-1
Automatic backups: Disabled
Lifecycle management: None
Performance mode: General Purpose
Throughput mode: Bursting
Encryption (Data at rest): Turned on
VPC: default
Subnet: Default Subnet (Depending on the AZ selected)
Security Group: Created from #1 (efs-sg-default)
* Leave everything else as default and create your EFS

—
#4: Creating Launch Template
—
Name: httpd-template
Auto Scaling guidance: Optional but I have turned it on
AMI: Amazon Linux 2
Instance type: t2.micro (Free tier eligible)
Key pair: Select any existing Key pair, or create a new one.
Security Group: Select “efs-sg-default” & “ec2-sg” SG created from #1
Storage: Default (8 GB)
Advanced Details
Request Spot Instances: Enabled
IAM instance profile: Select any IAM Role if you have
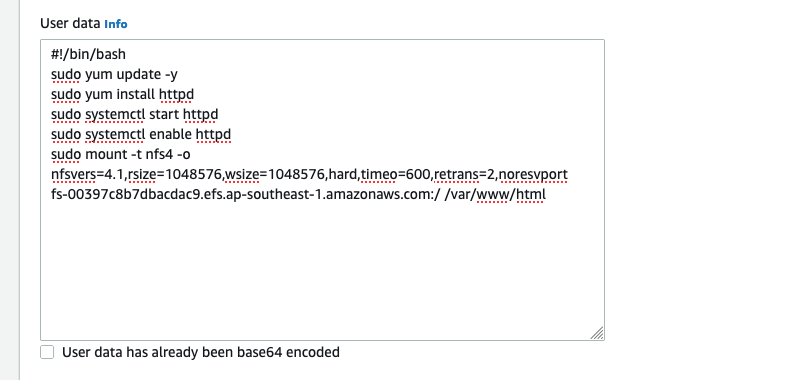
User Data Script:
#!/bin/bash
sudo yum update -y
sudo yum install httpd -y
sudo systemctl start httpd
sudo systemctl enable httpd
sudo mount -t nfs4 -o nfsvers=4.1,rsize=1048576,wsize=1048576,hard,timeo=600,retrans=2,noresvport “your_efs_ip”:/ /var/www/html
NOTE:
You may need to replace “your_efs_ip” with the real ID of your EFS which you may find in the AWS Management Console.
And, finally, create your Launch Template.
—
#5: Creating Target Groups for ALB
—
Choose a target type: Instances
Target group name: httpd-tg
Protocol: HTTP -> Port 80
VPC: AWS Default VPC
Health check protocol: HTTP
Health check path: /
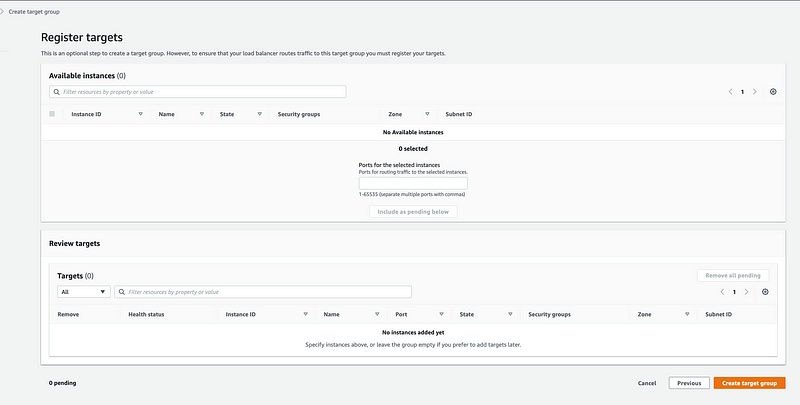
Click on “Next”
Register Instances: Do not select any instances
Finally, create the Target Group
—
#6: Create Application Load Balancer
—
Name: httpd-alb
Scheme: Internet-facing
IP address type: IPv4
VPC: AWS Default VPC
Subnet Mappings: Select all
Security Group: Created from #1 (allow-http-for-alb)
Target Group: Created from #5 (HTTP: 80 -> httpd-tg)
And create it!
—
#7: Create Auto Scaling Group
—
Auto Scaling group name: httpd-asg
Launch template: Created from #4) (httpd-template)
VPC: AWS Default VPC
AZ: Select all
Attach existing Load Balancer: Created from #6 (httpd-alb)
Desired capacity: 2
Minimum capacity: 1
Maximum capacity: 2
Scaling policies: None for now
Instance scale-in protection: Disabled
Tags:
1. Name -> “HTTPD Instance”
And create it!
Upon a success creation of resources in the steps above, you can now visit the URL of your ALB on the browser and enjoy it ! Your website files are now gathered in all the EC2 instances via EFS, and load balanced.
To add a new file, or change something — All you have is to SSH into one of the instances and change the files. It will be automatically reflected across all the other instances.

Woila! 💻