Building & Hosting a Discord Bot on AWS
Discord is a pretty amazing Platform. We all have been envisioning a collaborative platform among your family & friends, at least…

Building & Hosting a Discord Bot on Amazon EC2

Discord is a pretty amazing Platform. We all have been envisioning a collaborative platform among your family & friends, at least vigorously during the Pandemic. Discord has been evolving across the industry faster than any other Chat Platform. Initially, Discord was targeted purely for Games, and now making its way across millions of people across the globe! Discord can be used for free, and thankfully not hidden behind a paywall. However, Discord can be ramped up with Server Emojis, Custom Emotes, and more with the paid subscription called Discord Nitro. Let’s not forget something, they support streaming up to 4K (60 FPS).
In 2020, Discord introduced two major and useful features which are Slash Commands & Interaction Endpoints. However, there are not many use-cases for both of these features, just yet.
Okay, enough of storytelling. Let’s not go too deep into the history, let’s get right into the “cool stuff” — We have Uncle Google for the history :)
Why AWS?
I’m not going to put in a lot of details on this, as the results or cost would be self-explanatory. So, why AWS? Because they are reliable, cheap, and cost-effective. However, the steps listed below could work on any Virtual Private Server, Dedicated Server, or any Linux-based Servers.
Okay, let’s get started
This is for hosting a standard Python Discord Bot on AWS, I will be walking you through some cheesy boilerplate to get things started. However, I’m assuming that you already have adequate knowledge on developing a Discord Bot, including attaining the relevant Tokens and more!
Alright, show me the code & the cool stuff
Relax. Let’s dive deep!
— Step 1
Below is a simple gist on getting started with your own Discord Bot
— Step 2
Let’s create our Python Environment, with the installation of the dependency.
To get started, simply run the commands below to giddy things up. (Also, assuming you have adequate knowledge on setting up Virtual Env, etc).# Assuming you have created the file in Step 1 on a separate folder.
# Note: Activating the venv can be different on Windows. Or with any terminal extensions like fish, etc.python3 -m venv venv
pip install discord
pip freeze > requirements.txt
source venv/bin/activate
— Step 3
Now, assuming that you have gone through all the necessary steps to attain your own Discord Bot Token. If you are unsure, you may visit this link.
— Step 4
That is all on the setting up part. Let’s pack our Code Editor and store it in a safe place. In this step, we’ll be using Amazon EC2 to set up our bot & keep it always online.
— Step 5
Let’s now go to your AWS Console.
— Step 6
Now, let’s choose the EC2 instance of our choice. In this tutorial, I will be choosing “t2.micro”. If you’d like to estimate the cost & compare across all the types of instances AWS has to offer, simply visit this link.
Instance Configuration (Most default):
OS: Ubuntu 20.04 LTS (x86)
vCPU: 1
Memory: 1 GB
Storage: 8 GB
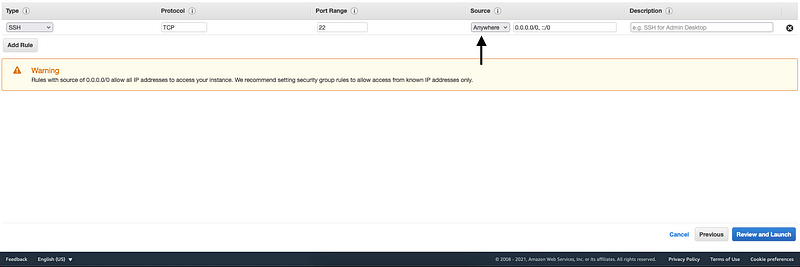
— Step 7
Now, once we’ve configured our instance. Let’s look into your security group. Please ensure port 22 is allowed from “Anywhere” as we’ll be using SSH to connect to the EC2. Please refer to the screenshot below.
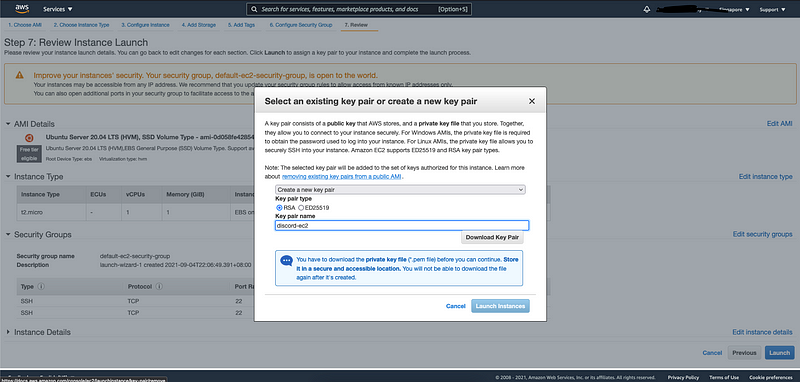
— Step 8
Alright. Once that is selected appropriately, let’s jump into the next step. Let’s now choose our Key Pair (If present) or create a separate Key Pair file.
NOTE: This Key Pair serves as the credential in order for you to log into your EC2. Please do not lose this file. The downloaded Key Pair file will come with the extension of “.pem”.
— Step 9
Now, we have got our EC2 fired up. Hold on! Before we move forward, let’s verify if our EC2 is running.
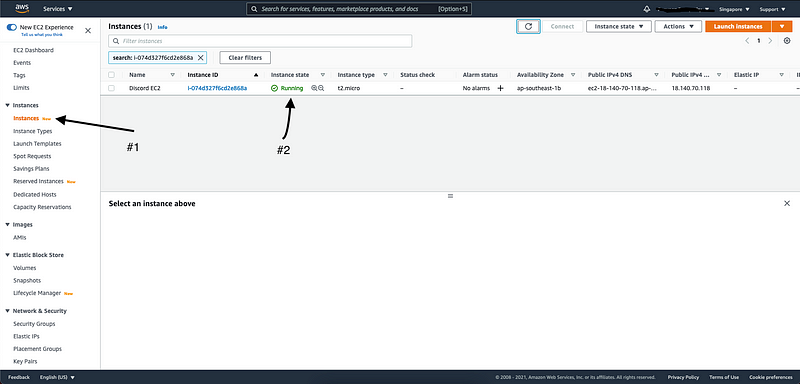
— Step 10
Woila! The EC2 server is now live. Let’s try connecting to it.
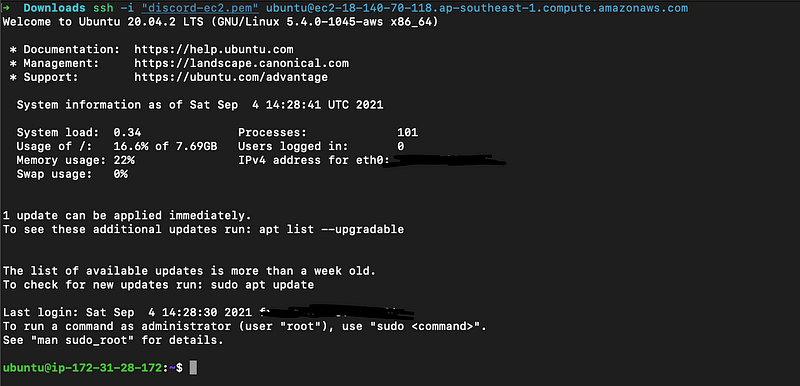
NOTE: You will have to use the .pem file to authenticate to the Server.# Open up your Terminal / Favorite SSH Client# If you are facing issues as "Bad Permission" while trying to authenticate, please change the file permission as below;chmod 600 discord-ec2.pem# Then, run this command to connect to the EC2 Server.
ssh -i "discord-ec2.pem" ubuntu@Your Public iPv4 DNSExample:
ssh -i "discord-ec2.pem" ubuntu@ec2-18-140-70-118.ap-southeast-1.compute.amazonaws.com
— Step 11
Upon successful authentication, you’ll be directly in the Shell of the EC2.
— Step 12
Now, let’s prepare our EC2 for some Rock & Roll.
Firstly, let’s update the dependenciesSimple run the command below in your EC2 Instancesudo apt-get update && sudo apt-get upgrade -y
— Step 13
Hold on right there!
How do we transfer the file from our Local Machine to the EC2?
Well, you “could” find many other ways of transferring the file to the EC2. In this Tutorial, I will be usingrsyncto transfer the file to the EC2.
Other methods you could consider:
- GitHub (Pull code from EC2)
- SFTP
- More
Let’s now giddy up rsync on our Local Machine. You may install rsync using Homebrew (Mac) or any other Package Manager for your corresponding Platform.Example (Mac OS):brew install rsync
— Step 14
Once rsync is installed on your local machine, let’s get the files moving.
Simply run the command below# Please replace the values accordingly when executing.rsync -azvv --progress -e "ssh -i discord-ec2.pem" \
/path/to/your/code/folder \
ubuntu@ec2-18-140-70-118.ap-southeast-1.compute.amazonaws.com:~/
—
Now, that your files are on the Server. Quickly, verify the files with the following commandscd folder
ls -all
—
Once all files are intact, let’s set up the Python Environment.
Firstly, create the Python Virtual Environment.cd path/to/your/code/in/the/server
sudo apt install python3.8-venv -y
python3 -m venv venv
Secondly, let’s activate the newly created Virtual Environment & Install the dependenciessource venv/bin/activate
pip install -r requirements.txt
Lastly, assuming you have replaced the Discord Auth Token with a Token attained from Discord’s Developer Portal. Let’s run it# Simply run the command belowpython3 run.py
—
Cleaning up
Woila! Your new Discord Bot hosted on Amazon EC2 should be now live!
So I can’t use my EC2? Do I have to keep this EC2 for Discord Bot?
Well, yes. But not really :D
Relax amigo! You can use screen . The screen is installed by default on your EC2.
Here are the steps on running the Bot using the Screen.
— Step 1
Creating a new Screen (Named)screen -S discord
— Step 2
You may run the Bot on the Screen with the command belowpython3 run.py
— Step 3
Re-attaching back the Screenscreen -R discord
Conclusion
All the steps listed are curated in such a way where it can be understood and followed along.
Rest assured, your Discord Bot should now be online!
Stay Safe. Happy Coding & Happy Deploying!